About a year ago, I posted two articles about setting up my Raspberry Pi as a home server and how I setup remote access to it from anywhere in the world without using portforwarding. I’ve had a few people stumble across my post, asking questions and sharing details about their projects with me! I thought I’d take the time to better address an area people seem to be having difficulty with, which is how to setup a tinc network between a cloud server and a computer on a home network.
What are we trying to achieve?
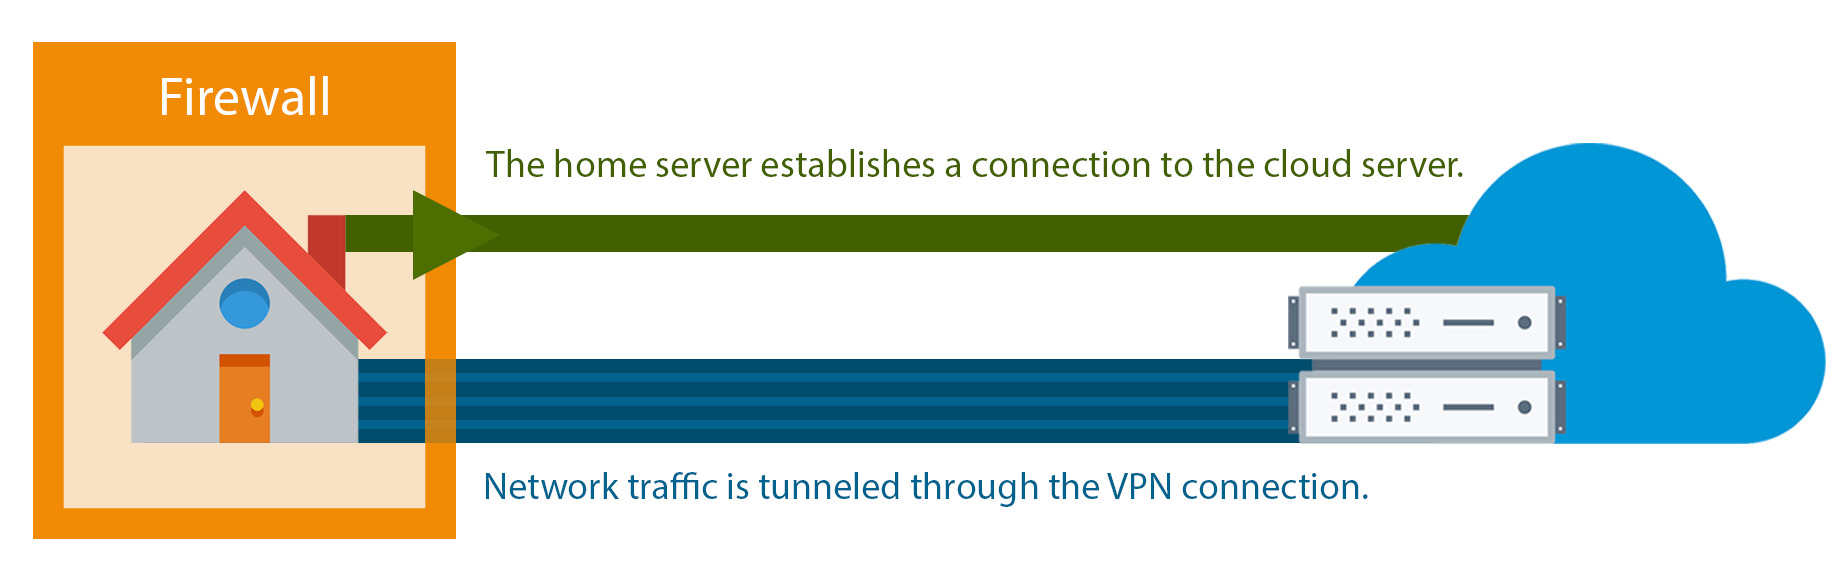
Lets say you want to access some content or service from a computer at your house from some other computer on the internet. But, like with most home network setups your computer isn’t reachable from the public internet. This is probably because your home network has a dynamic IP address and some other restrictions (like firewalls and NATs) that make connecting to it a challenge.
We can achieve this if the computer you want to connect from has a fixed public IP address. But how? Well, the computer at home can still make outgoing connections to the one with a fixed IP address. We can tunnel network traffic through this connection to link the machines together; this is called a Virtual Private Network (VPN).
In my situation, I wanted to get access to services on my Raspberry Pi at home from anywhere on the internet without needing to configure port forwarding. The first step in this was to establish a reliable VPN between my Pi and cloud server so that when I access an address like “plex.jordancrawford.kiwi” my cloud server can pass the traffic through the VPN link to the Pi at home.
tinc is an awesome open-source piece of software that we’ll use to setup this VPN link. My Raspberry Pi runs HypriotOS (but Raspberry Pi OS is a good option too) and my cloud server is a Vultr cloud server running Ubuntu.
Installing tinc

You’ll need tinc installed on both the home server and the cloud server.
Manual installation
Installing tinc will vary by operating system, so Google is your friend. But, if you’re feeling lucky, try the following commands:
sudo -s
apt-get update
apt-get install tinc
If you don’t have any luck, you could try compiling it from source.
Verify your installation works by running the command tincd --help. If this outputs a message explaining all the options of tinc then everything worked fine!
Your tinc config directory will be /etc/tinc by default.
With Docker
I personally use Docker to run tinc in a container on my home server - I wrote more about Docker in my Raspberry Pi home server article.
On the Linux x86 server I use: jenserat/tinc
On a Raspberry Pi I use: jordancrawford/rpi-tinc.
Make a directory somewhere on your system for your tinc config. For
both the above Docker images, you should configure a volume mapping from
your tinc config directory to /etc/tinc inside the tinc container.
Planning our configuration
We’re using tinc for quite a simple usecase, and as a result, the only things we need to plan out in advance are the names and IP addresses of each of our servers on the tinc network.
I’ll call my cloud server with the public fixed IP address cloud, and my home server behind a home network home.
For the IP addresses, we want an IP address range that won’t clash with my home’s local network. I find the 10.0.0.XXX works pretty well, so I’ll configure the IP’s as below.
| Computer Name | tinc IP |
|---|---|
| cloud | 10.0.0.1 |
| home | 10.0.0.2 |
This means that from the cloud server, accessing 10.0.0.2 will route us to the home server on the other side of the tinc tunnel, and vice versa.
Configuring cloud

Lets start by configuring the cloud server.
You can find my full example configuration for the cloud server on GitHub.
Config file
In your tinc config directory, open your favorite text editor and make a tinc.conf file.
Lets fill this in with the following:
Name = cloud
AddressFamily = ipv4
Interface = tun0
This just says that the name of our server on tinc is “cloud”, that it uses IPv4 and uses a network interface called tun0.
Up and down scripts
Next we need to setup a tinc-up and tinc-down script. These are what tinc uses to attach itself to it’s network interface. Make a tinc-up file containing the following:
ifconfig $INTERFACE 10.0.0.1 netmask 255.255.255.0
Then, make a tinc-down file containing the following:
ifconfig $INTERFACE down
Lets make these scripts executable by running the command: chmod +x tinc-*
Public and private keys
Next, we need to generate the public / private key pair for cloud.
This will create an entry for cloud in the hosts directory, but we need to make a hosts directory first! Run: mkdir hosts to make this directory.
Generate the keys with tincd -c . -K and hit enter when it asks where to put your private and public keys.
Here’s what this command looks like for me:
root@vultr:~# tincd -c . -K
Generating 4096 bits keys:
......................................................................................++ p
..............................................++ q
Done.
Please enter a file to save private RSA key to [/root/tinc-example-cloud/rsa_key.priv]:
Please enter a file to save public RSA key to [/root/tinc-example-cloud/hosts/cloud]:
(if you’re running with Docker, use docker run -v [your tinc config path]:/etc/tinc --name tinc [image name] -K to generate keys instead)
You’ll now have an rsa_key.priv file with this servers private key and a cloud file in the hosts directory with it’s public key.
Now we just need to add some additional information to our hosts/cloud file. Edit this file by adding an Address and Subnet so it looks like the following:
Address = [the hostname or IP address of the cloud server. e.g.: server.mydomain.com]
Subnet = 10.0.0.1/32

-----BEGIN RSA PUBLIC KEY-----
[the generated public key for the cloud server]
-----END RSA PUBLIC KEY-----
Configuring home

Now, login to your home server and we’ll set it up in a similar way.
You can find my full example configuration for the home server on GitHub.
Config file
Make a tinc.conf file with the following contents:
Name = home
AddressFamily = ipv4
Interface = tun0
ConnectTo = cloud
Similar to cloud, this defines the name, address type
and interface for tinc. However, in addition, this also tells it to make
a connection to the server called cloud.
Up and down scripts
Like last time we’ll make a the tinc-up and tinc-down scripts.
Your tinc-up script would be:
ifconfig $INTERFACE 10.0.0.2 netmask 255.255.255.0
And your tinc-down would be the same with:
ifconfig $INTERFACE down
Once again, make these scripts executable by running chmod +x tinc-*.
Public / private keys
Make the hosts directory with mkdir hosts, generate the keys with tincd -c . -K then add the Subnet to your hosts/home file so it looks like the following:
Subnet = 10.0.0.2/32

-----BEGIN RSA PUBLIC KEY-----
[the generated public key for the home server]
-----END RSA PUBLIC KEY-----
Telling the servers about each other
The final step is to tell the servers about each other. The
information that each server needs about the other is all contained in
the hosts directory. In these host files the Subnet
tells us which IP each server should have once connected while the
public key is used to secure the connection and verify we’re actually
communicating with the server we expect!
This step is pretty easy to do, we just need to make the hosts directorys the same across both systems! Just copy your hosts/cloud file from cloud to the hosts on home, then copy your hosts/home file from home to hosts on cloud.
Testing everything works
Finally, the moment of truth! Run tincd on both of your servers.
You might benefit from initially running in no-detach mode with tincd -D.
If you hit Ctrl + c this will increase the log level of the server so
you can see all the messages between the two servers. To exit, hit Ctrl +
\.
If everything worked correctly you should be able to access home from 10.0.0.2 on cloud. You might want to try initiate an SSH connection or access a web service from home, e.g.: ssh [you]@10.0.0.2 or wget 10.0.0.2.
Nice one! You’ve now setup a VPN between a cloud server and your home server behind your restricted home network. Next up you could try setting up an HTTP proxy on your cloud server to access your home services from anywhere.